영상처리 알고리즘 병렬화 - [OpenCV][C++]영상에 Median Filter(중간값 필터) 적용
Previous Post
영상처리 알고리즘 병렬화 - [OpenCV][C++]영상에 Salt and Pepper Noise 추가
영상처리 알고리즘 병렬화 - [OpenCV][C++]영상에 Salt and Pepper Noise 추가
Previous Post 영상처리 알고리즘 병렬화 - [OpenCV][C++]영상 읽기/출력/저장 영상처리 알고리즘 병렬화 - [OpenCV][C++]영상 읽기/출력/저장 OpenCV(Open Source Computer Vision Library) : 실시간 컴퓨터 비전을 목적
soobin0821.tistory.com
Goal
- 노이즈 추가된 영상에 Median Filter 적용
- 필터 적용된 영상을 출력 및 저장
Median Filter 알고리즘
이미지 내의 노이즈를 제거하는 방법 중 하나로, 주어진 마스크 영역의 값들을 크기 순서대로 정렬한 후 그 중 중간 크기의 값을 선택하는 필터
Median Filter 원리
1. 전체 이미지를 일정한 크기의 작은 영역으로 나눈다.
[ 예시 ]
마스크 크기 : 3 * 3
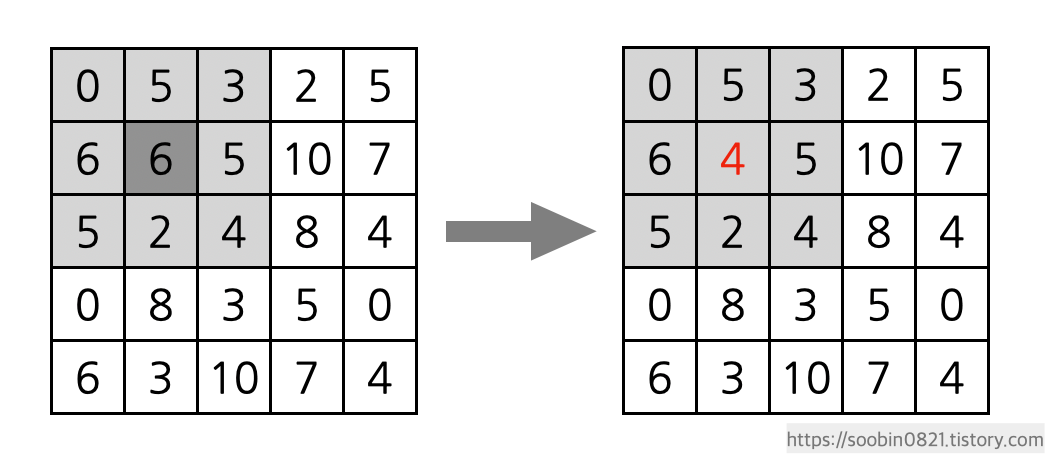
2. 나누어진 영역의 모든 픽셀값를 크기 순으로 정렬하고, 나누어진 영역의 가운데 픽셀을 중간값으로 대체한다.
[ 예시 ]
픽셀값 정렬 전 : 0, 5, 3, 6, 6, 5, 5, 2, 4
픽셀값 정렬 후 : 0, 2, 3, 4, 5, 5, 5, 6, 6
중간값 : 4
3. 이미지 픽셀을 픽셀 단위로 한 칸씩 이동하면서 계속 작동한다.
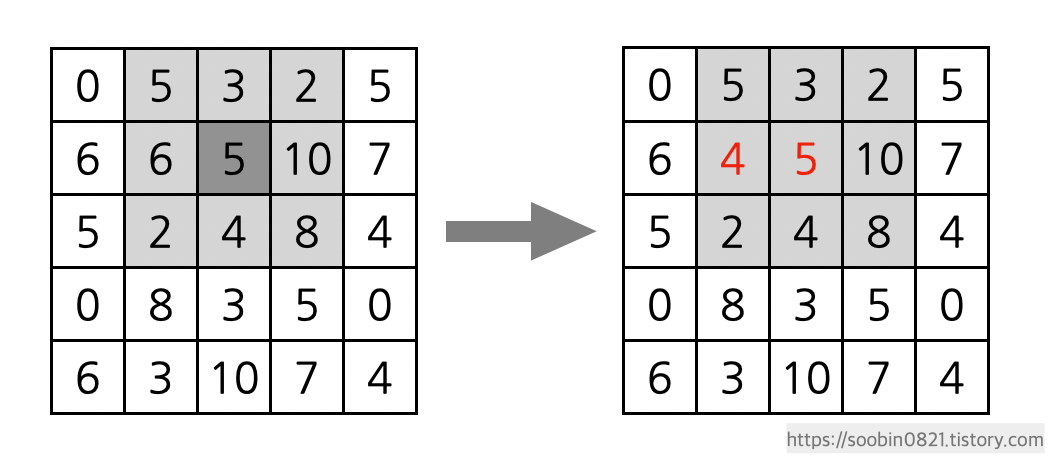
[ 예시 ]
픽셀값 정렬 전 : 5, 3, 2, 6, 5, 10, 2, 4, 8
픽셀값 정렬 후 : 2, 2, 3, 4, 5, 5, 6, 8, 10
중간값 : 5
Median Filter 특징
+ Salt and Pepper 노이즈라고 불리는 Impulse 노이즈 제거에 효과적이다.
⇒ 검은색(필셀값 0) 또는 흰색(픽셀값 255) 점과 같이 데이터들의 중심에서 멀리 벗어나는 이상치(outlier)들을 제외하기 때문
* Impulse Noise : 순간적으로 값이 튀는 잡음
- 마스크의 크기가 작은 경우, 잡음이 몰려 있는 영역은 잡음이 남아있을 수 있다.
- 마스크의 크기가 클 경우, 이미지의 윤곽이 무너질 수 있다.
- 연산량이 많이 필요하다.
⇒ 픽셀값들을 정렬해야 하기 때문
◦ void cv::medianBlur(InputArray src, OutputArray dst, int ksize)
이미지에 Median Filter를 적용한다.
- src : 입력 이미지
- dst : 반환 이미지
- ksize : 커널의 크기
- 1보다 큰 홀수 (중간값을 찾기 위함)
Content
- 이후 Median Filter 알고리즘의 주요 연산과정을 병렬화하기 위해 ⋯
- OpenCV에서 제공하는 medianBlur() 함수를 사용하지 않고 Median Filter 알고리즘을 직접 구현하였다.
- STL에서 제공하는 sort() 함수를 사용하지 않고 정렬 알고리즘을 직접 구현하였다.
void applyFilter(Mat &image, int kernal_size)
{
    int row_size = image.rows;
    int col_size = image.cols;
    int ch_num = image.channels();

    int center_pixel = kernal_size / 2;

    if(ch_num == 1)
    {
        vector<int> pixels(kernal_size * kernal_size);
        for(int row = 0; row < row_size - kernal_size; row++)
        {
            for(int col = 0; col < col_size - kernal_size; col++)
            {
                pixels.clear();
                for(int r = 0; r < kernal_size; r++)
                {
                    for(int c = 0; c < kernal_size; c++)
                    {
                        pixels.push_back(image.at<uchar>(row + r, col + c));
                    }
                }

                Bubble_Sort(pixels);

                image.at<uchar>(row + center_pixel, col + center_pixel) = pixels.at(kernal_size + center_pixel);
            }
        }
    }
    else if(ch_num == 3)
    {
        vector<int> pixels_B(kernal_size * kernal_size);
        vector<int> pixels_G(kernal_size * kernal_size);
        vector<int> pixels_R(kernal_size * kernal_size);
        for(int row = 0; row < row_size - kernal_size; row++)
        {
            for(int col = 0; col < col_size - kernal_size; col++)
            {
                pixels_B.clear();
                pixels_R.clear();
                pixels_G.clear();
                for(int r = 0; r < kernal_size; r++)
                {
                    for(int c = 0; c < kernal_size; c++)
                    {
                        pixels_B.push_back(image.at<Vec3b>(row + r, col + c)[0]);
                        pixels_G.push_back(image.at<Vec3b>(row + r, col + c)[1]);
                        pixels_R.push_back(image.at<Vec3b>(row + r, col + c)[2]);
                    }
                }

                Bubble_Sort(pixels_B);
                Bubble_Sort(pixels_G);
                Bubble_Sort(pixels_R);

                image.at<Vec3b>(row + center_pixel, col + center_pixel)[0] = pixels_B.at(kernal_size + center_pixel);
                image.at<Vec3b>(row + center_pixel, col + center_pixel)[1] = pixels_G.at(kernal_size + center_pixel);
                image.at<Vec3b>(row + center_pixel, col + center_pixel)[2] = pixels_R.at(kernal_size + center_pixel);
            }
        }
    }
}
- 이후 병렬 프로그래밍의 성능 향상을 극대화하기 위해 ⋯
- 시간 복잡도가 높은 Bubble Sort 알고리즘을 직접 구현하였다.
void Bubble_Sort(vector<int> &pixels)
{
    for(int i = 0; i < pixels.size() - 1; i++)
    {
        for(int j = 0; j < pixels.size() - 1; j++)
        {
            if(pixels[j] > pixels[j + 1])
            {
                swap(pixels[j], pixels[j + 1]);
            }
        }
    }
}
정렬(Sort) 알고리즘
정렬(Sort) 알고리즘 데이터를 정해진 기준에 따라 순서대로 나열해 의미 있는 구조로 재설정하는 것 버블(Bubble) 정렬 알고리즘 데이터의 인접 요소끼리 비교하고, swap 연산을 수행하며 정렬하는
soobin0821.tistory.com
Code
#include <iostream>
#include <opencv2/opencv.hpp>
using namespace std;
using namespace cv;

void addNoise(Mat &image, int noise_num);   // 노이즈 추가
void applyFilter(Mat &image, int kernal_size);  // 필터 적용
void Bubble_Sort(vector<int> &pixels);   // 버블 정렬

int main(void)
{
    VideoCapture open_origin_video("vtest.avi");
    if(!open_origin_video.isOpened())
    {
        cerr << "ERROR! Unable to open the Origin Video\n";
        open_origin_video.release();
        return -1;
    }

    double fps = open_origin_video.get(CAP_PROP_FPS);
    int width = open_origin_video.get(CAP_PROP_FRAME_WIDTH);
    int height = open_origin_video.get(CAP_PROP_FRAME_HEIGHT);
    int fourcc = VideoWriter::fourcc('m', 'p', '4', 'v');

    VideoWriter save_origin_video("save_origin_video.mov", fourcc, fps, Size(width, height));
    VideoWriter save_noise_video("save_noise_video.mov", fourcc, fps, Size(width, height));
    VideoWriter save_filter_video("save_filter_video.mov", fourcc, fps, Size(width, height));

    while(open_origin_video.isOpened())
    {
        Mat origin_frame;
        open_origin_video >> origin_frame;

        if(origin_frame.empty())
        {
            cerr << "ERROR! blank Origin Frame grabbed\n";
            return 0;
        }

        // 원본 영상 출력, 저장
        imshow("Origin Video", origin_frame);
        save_origin_video << origin_frame;


        Mat noise_frame;
        noise_frame = origin_frame.clone();

        addNoise(noise_frame, 5000);    // 노이즈 추가

        // 노이즈가 적용된 영상 출력, 저장
        imshow("Noise Video", noise_frame);
        save_noise_video << noise_frame;


        Mat filter_frame;
        filter_frame = noise_frame.clone();

        applyFilter(filter_frame, 3);  // 필터 적용

        // 필터가 적용된 영상 출력, 저장
        imshow("Filter Video", filter_frame);
        save_filter_video << filter_frame;


        if(waitKey(1000) == 'q')
        {
            break;
        }
    }

    open_origin_video.release();
    save_origin_video.release();
    save_noise_video.release();
    save_filter_video.release();


    destroyAllWindows();

    return 0;
}


void addNoise(Mat &image, int noise_num)
{
    srand((unsigned int)time(NULL));

    for(int k = 0; k < noise_num; k++)
    {
        int col_pixel = rand() % image.cols;    // noise를 추가할 열을 임의로 선택
        int row_pixel = rand() % image.rows;    // noise를 추가할 행을 임의로 선택
        int ch_num = image.channels();
        int noise_color = (rand() % 2) * 255;   // 0 or 255

        if(ch_num == 1) // 흑백 영상
        {
            image.at<uchar>(row_pixel, col_pixel) = noise_color;    // 임의 픽셀의 픽셀값을 검정색(0) 혹은 흰색(255)으로 교체
        }
        else if(ch_num == 3)    // 컬러 영상
        {
            image.at<Vec3b>(row_pixel, col_pixel)[0] = noise_color;  // B 채널
            image.at<Vec3b>(row_pixel, col_pixel)[1] = noise_color;  // G 채널
            image.at<Vec3b>(row_pixel, col_pixel)[2] = noise_color;  // R 채널
        }
    }
}

void applyFilter(Mat &image, int kernal_size)
{
    int row_size = image.rows;
    int col_size = image.cols;
    int ch_num = image.channels();

    int center_pixel = kernal_size / 2;

    if(ch_num == 1) // 흑백 영상
    {
        vector<int> pixels(kernal_size * kernal_size);
        for(int row = 0; row < row_size - kernal_size; row++)
        {
            for(int col = 0; col < col_size - kernal_size; col++)
            {
                pixels.clear();
                for(int r = 0; r < kernal_size; r++)
                {
                    for(int c = 0; c < kernal_size; c++)
                    {
                        pixels.push_back(image.at<uchar>(row + r, col + c));
                    }
                }

                Bubble_Sort(pixels);

                image.at<uchar>(row + center_pixel, col + center_pixel) = pixels.at(kernal_size + center_pixel);
            }
        }
    }
    else if(ch_num == 3)   // 컬러 영상
    {
        vector<int> pixels_B(kernal_size * kernal_size);
        vector<int> pixels_G(kernal_size * kernal_size);
        vector<int> pixels_R(kernal_size * kernal_size);
        for(int row = 0; row < row_size - kernal_size; row++)
        {
            for(int col = 0; col < col_size - kernal_size; col++)
            {
                pixels_B.clear();
                pixels_R.clear();
                pixels_G.clear();
                for(int r = 0; r < kernal_size; r++)
                {
                    for(int c = 0; c < kernal_size; c++)
                    {
                        pixels_B.push_back(image.at<Vec3b>(row + r, col + c)[0]);
                        pixels_G.push_back(image.at<Vec3b>(row + r, col + c)[1]);
                        pixels_R.push_back(image.at<Vec3b>(row + r, col + c)[2]);
                    }
                }

                Bubble_Sort(pixels_B);
                Bubble_Sort(pixels_G);
                Bubble_Sort(pixels_R);

                image.at<Vec3b>(row + center_pixel, col + center_pixel)[0] = pixels_B.at(kernal_size + center_pixel);
                image.at<Vec3b>(row + center_pixel, col + center_pixel)[1] = pixels_G.at(kernal_size + center_pixel);
                image.at<Vec3b>(row + center_pixel, col + center_pixel)[2] = pixels_R.at(kernal_size + center_pixel);
            }
        }
    }
}

void Bubble_Sort(vector<int> &pixels)
{
    for(int i = 0; i < pixels.size() - 1; i++)
    {
        for(int j = 0; j < pixels.size() - 1; j++)
        {
            if(pixels[j] > pixels[j + 1])
            {
                swap(pixels[j], pixels[j + 1]);
            }
        }
    }
}
Result
- Salt and Pepper Noise가 추가된 영상에 Median Filter가 적용된 새로운 영상이 화면에 출력되는 동안 새로운 영상 파일이 생성된다.
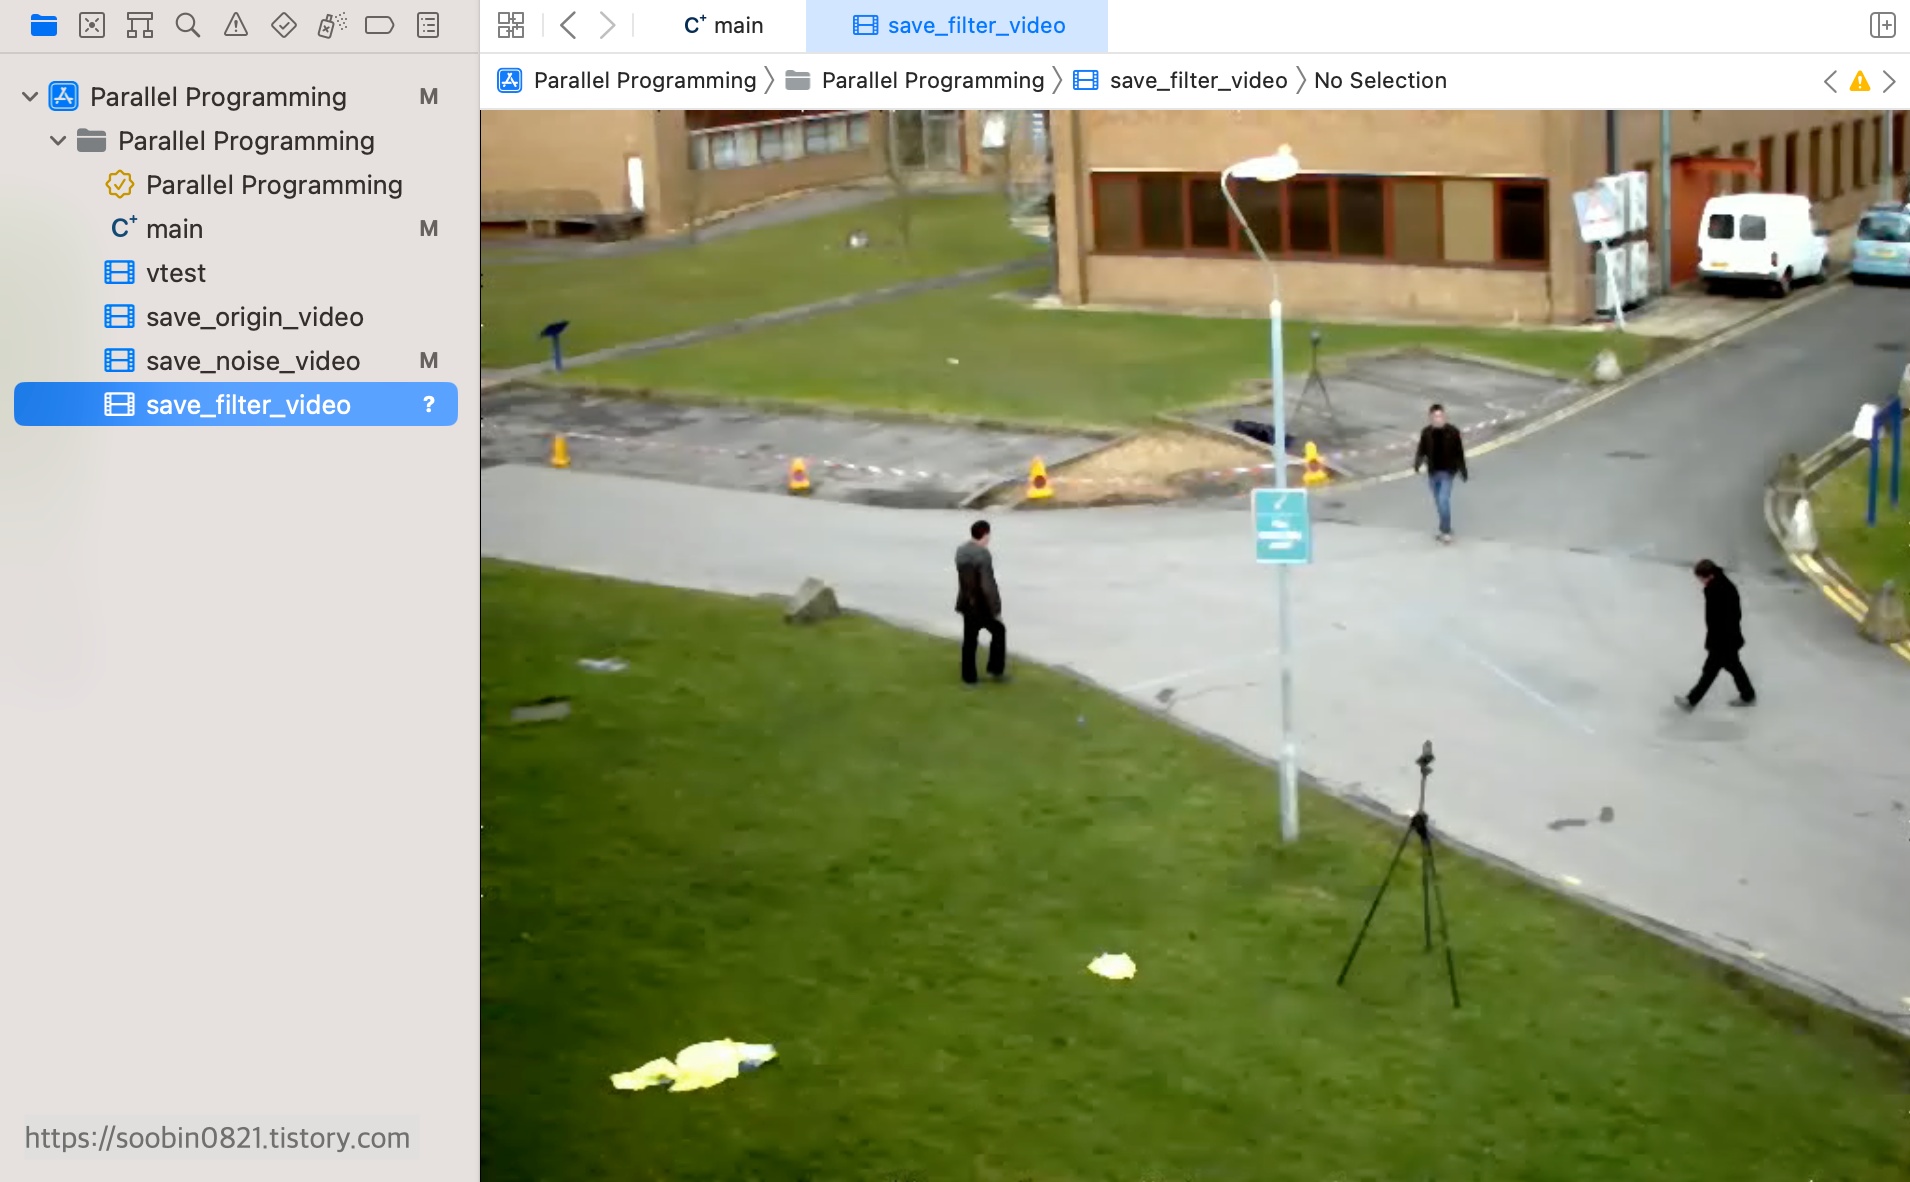
- 영상이 종료될 경우, 생성했던 윈도우가 전부 제거된다.
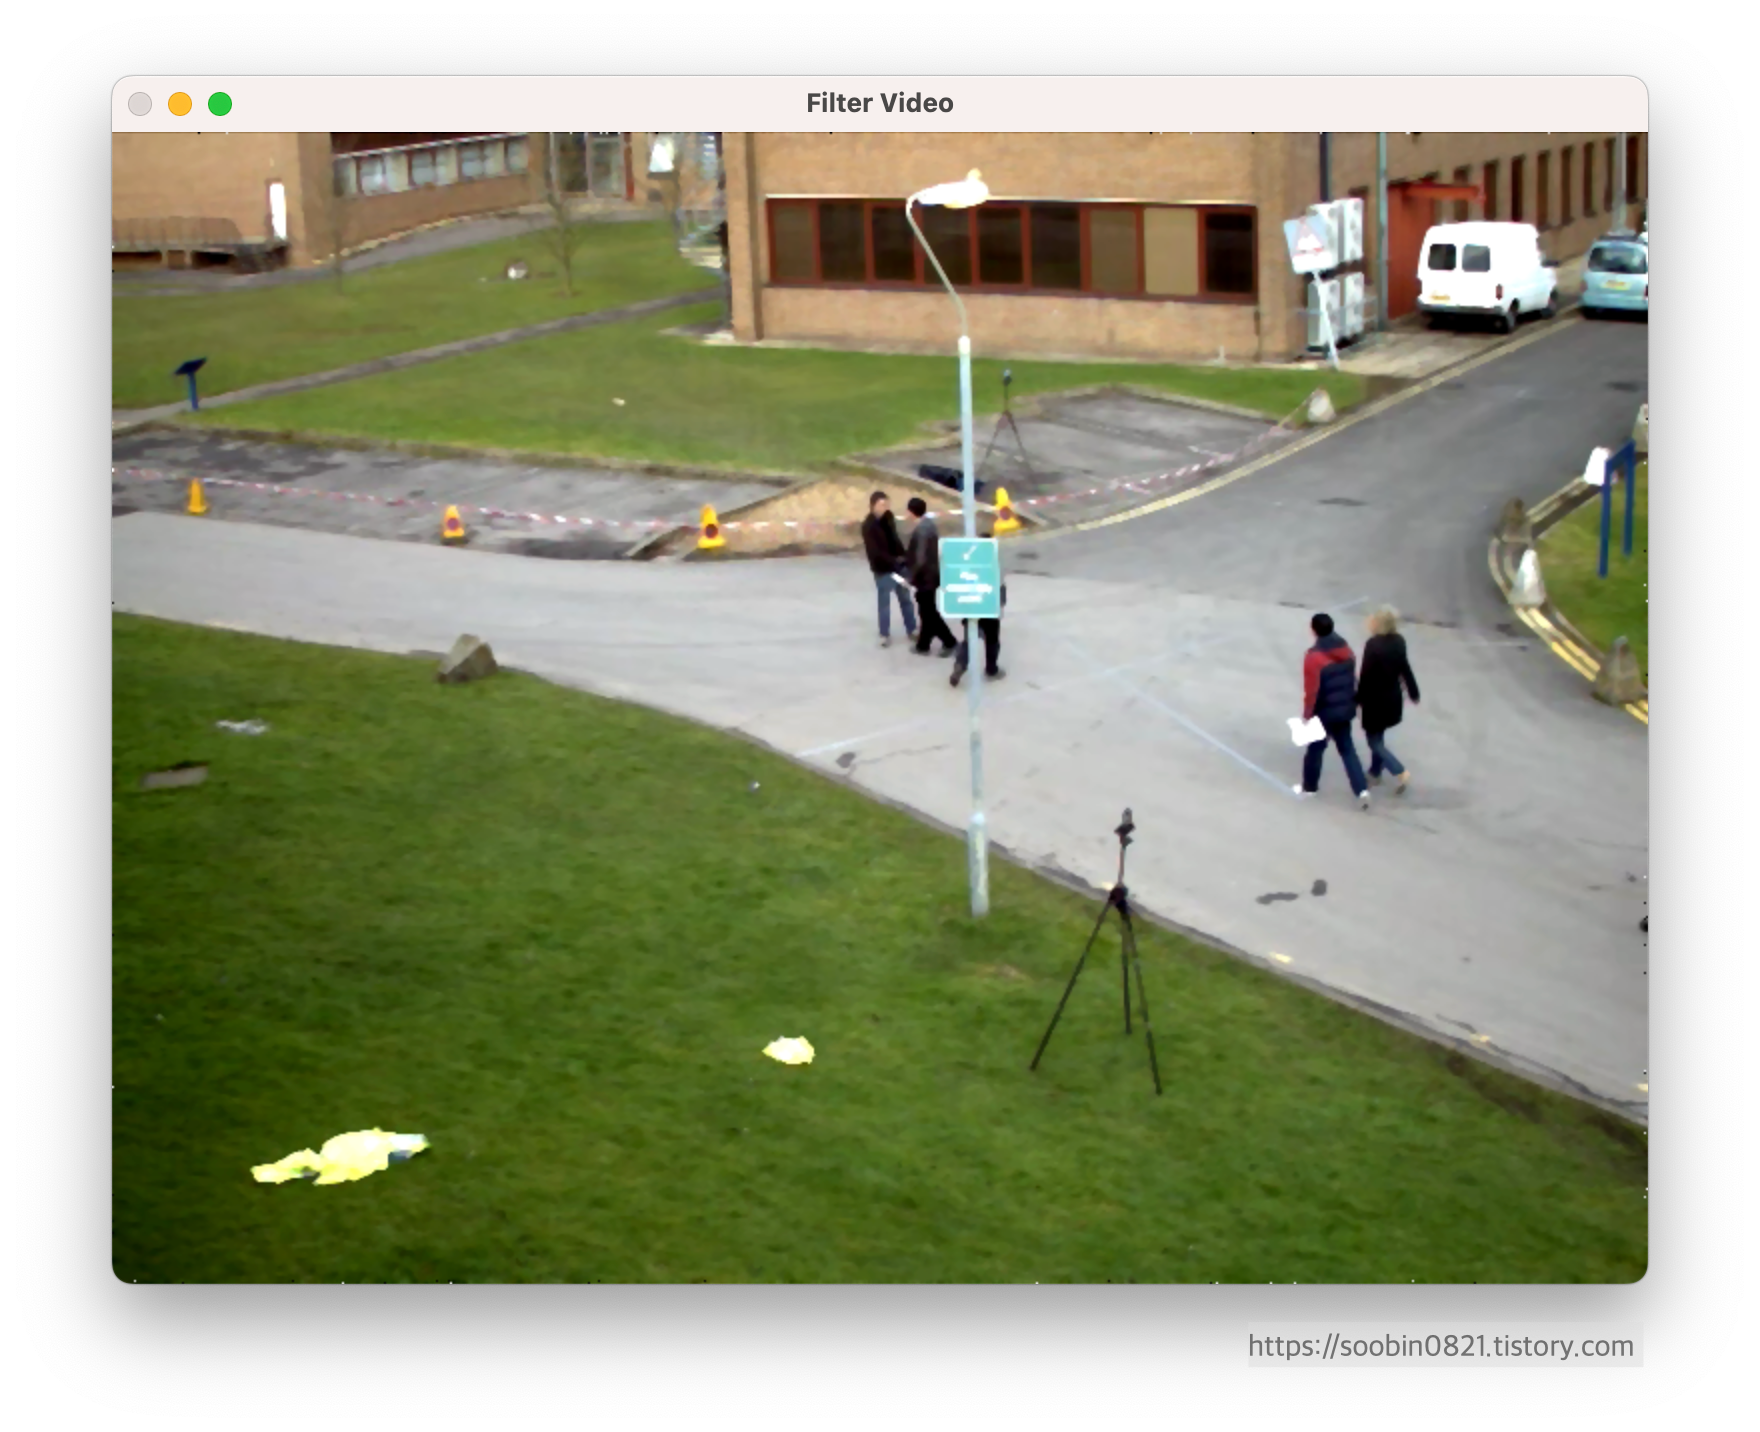
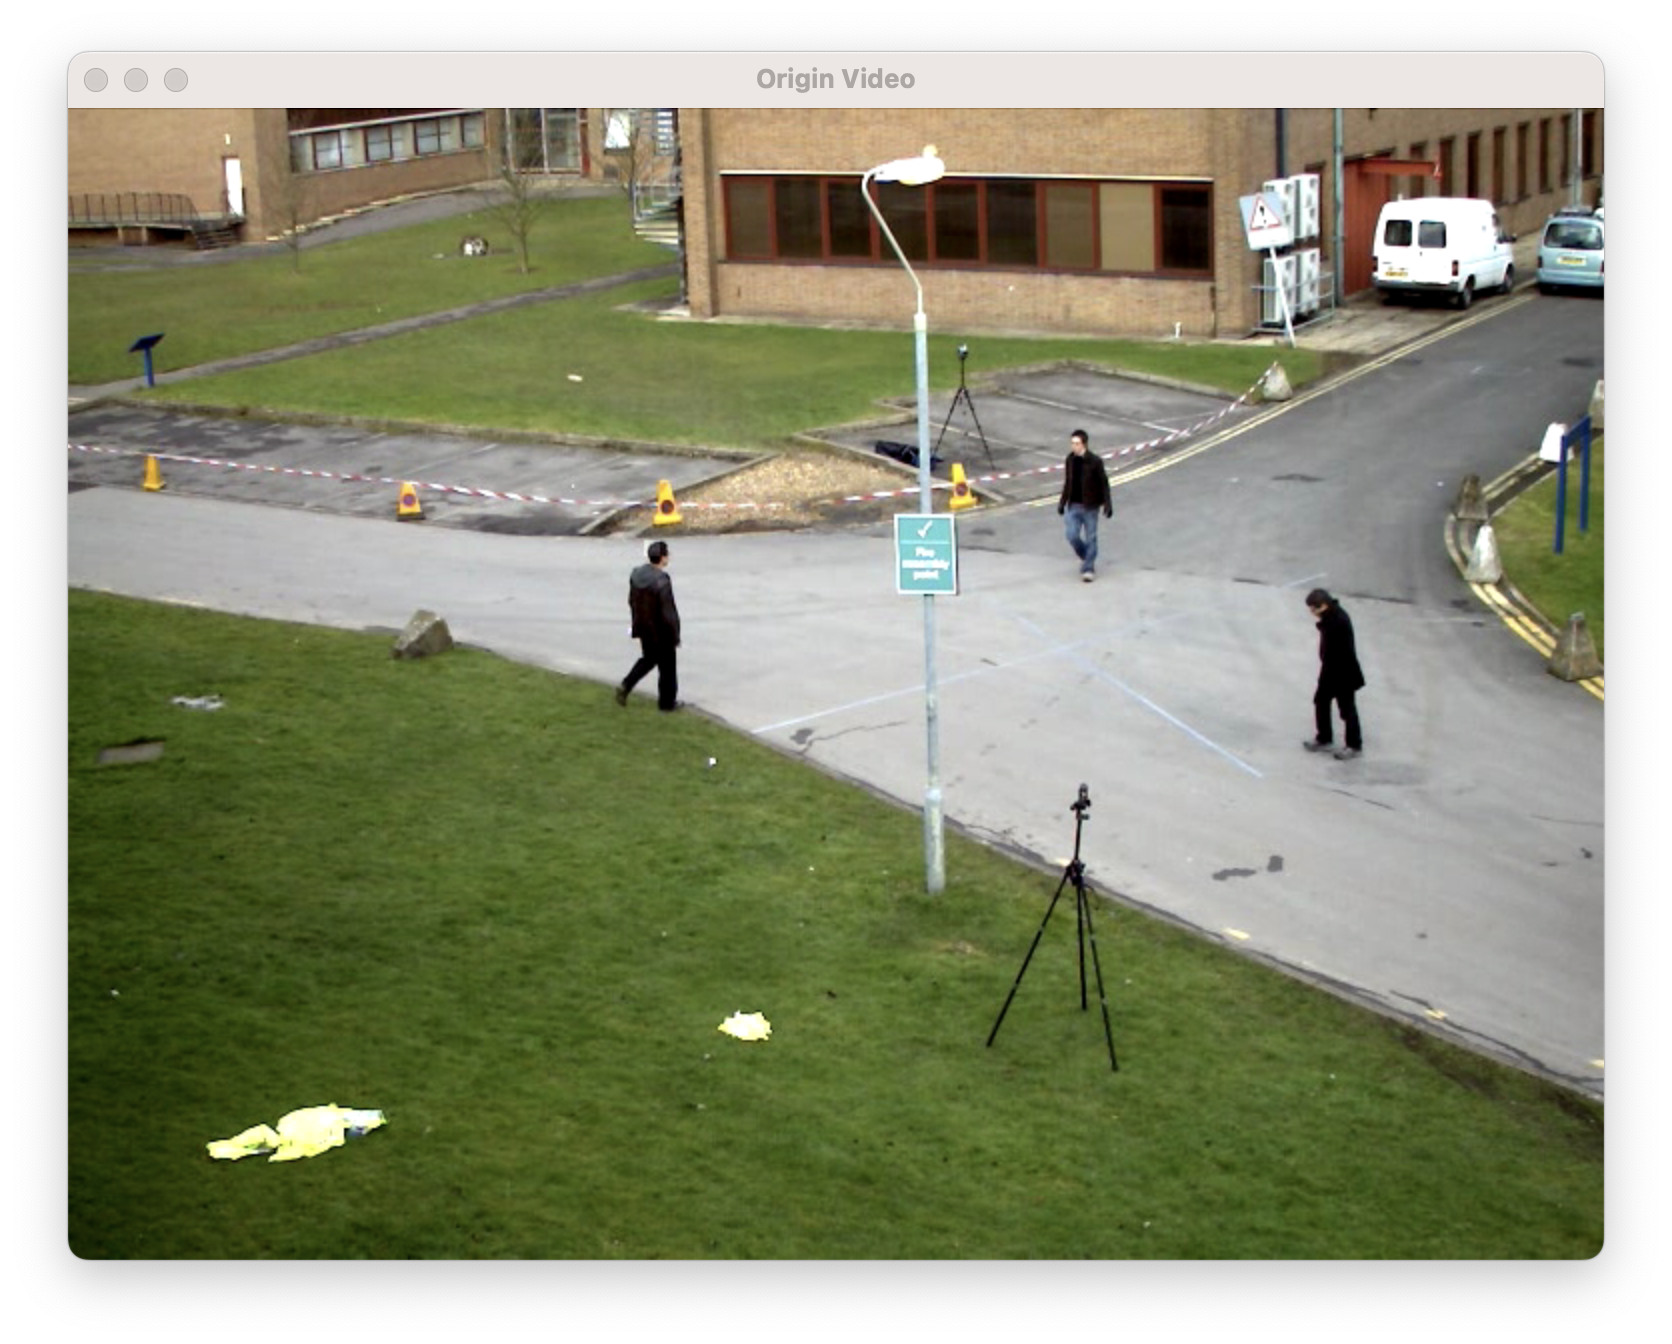
- 원본 영상 - Salt and Pepper Noise 추가된 영상 - Median Filter 적용된 영상 비교
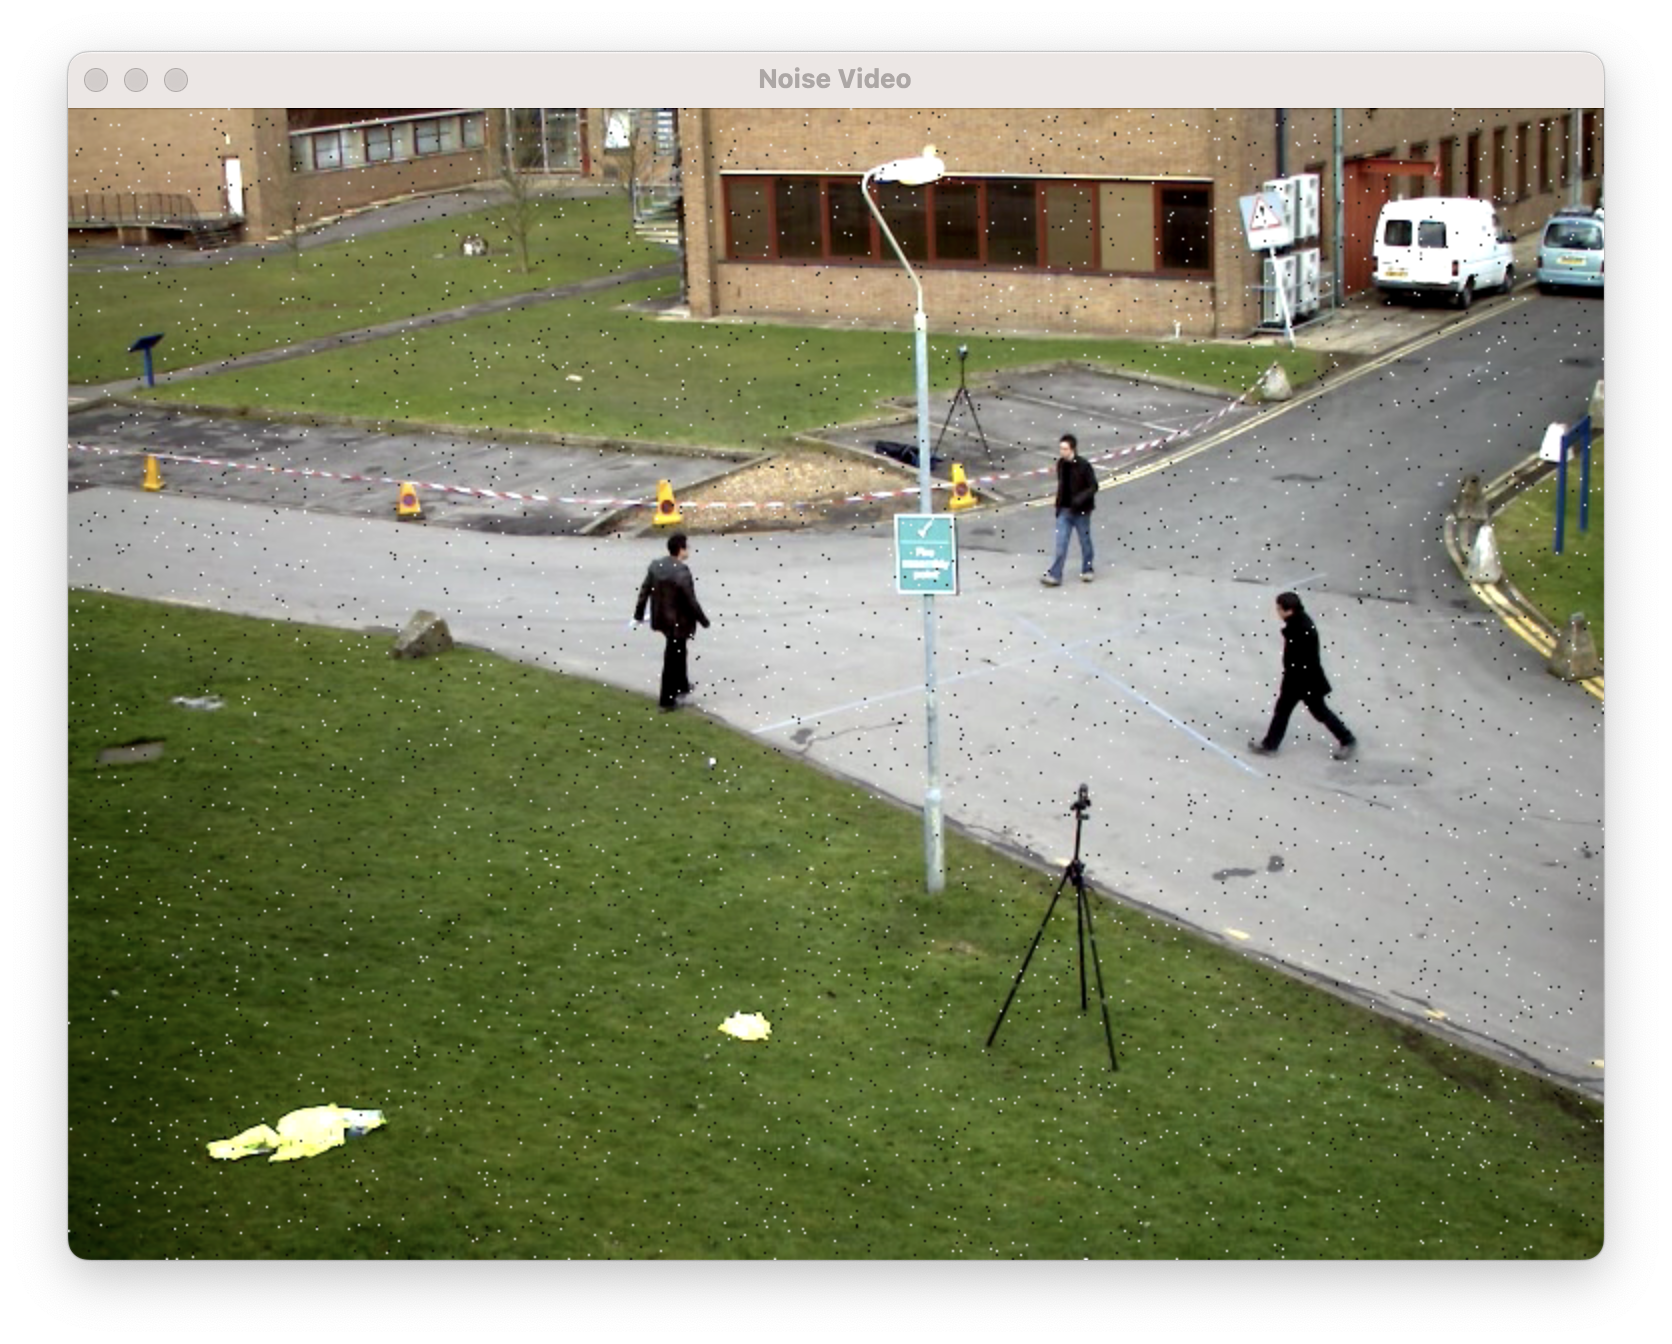
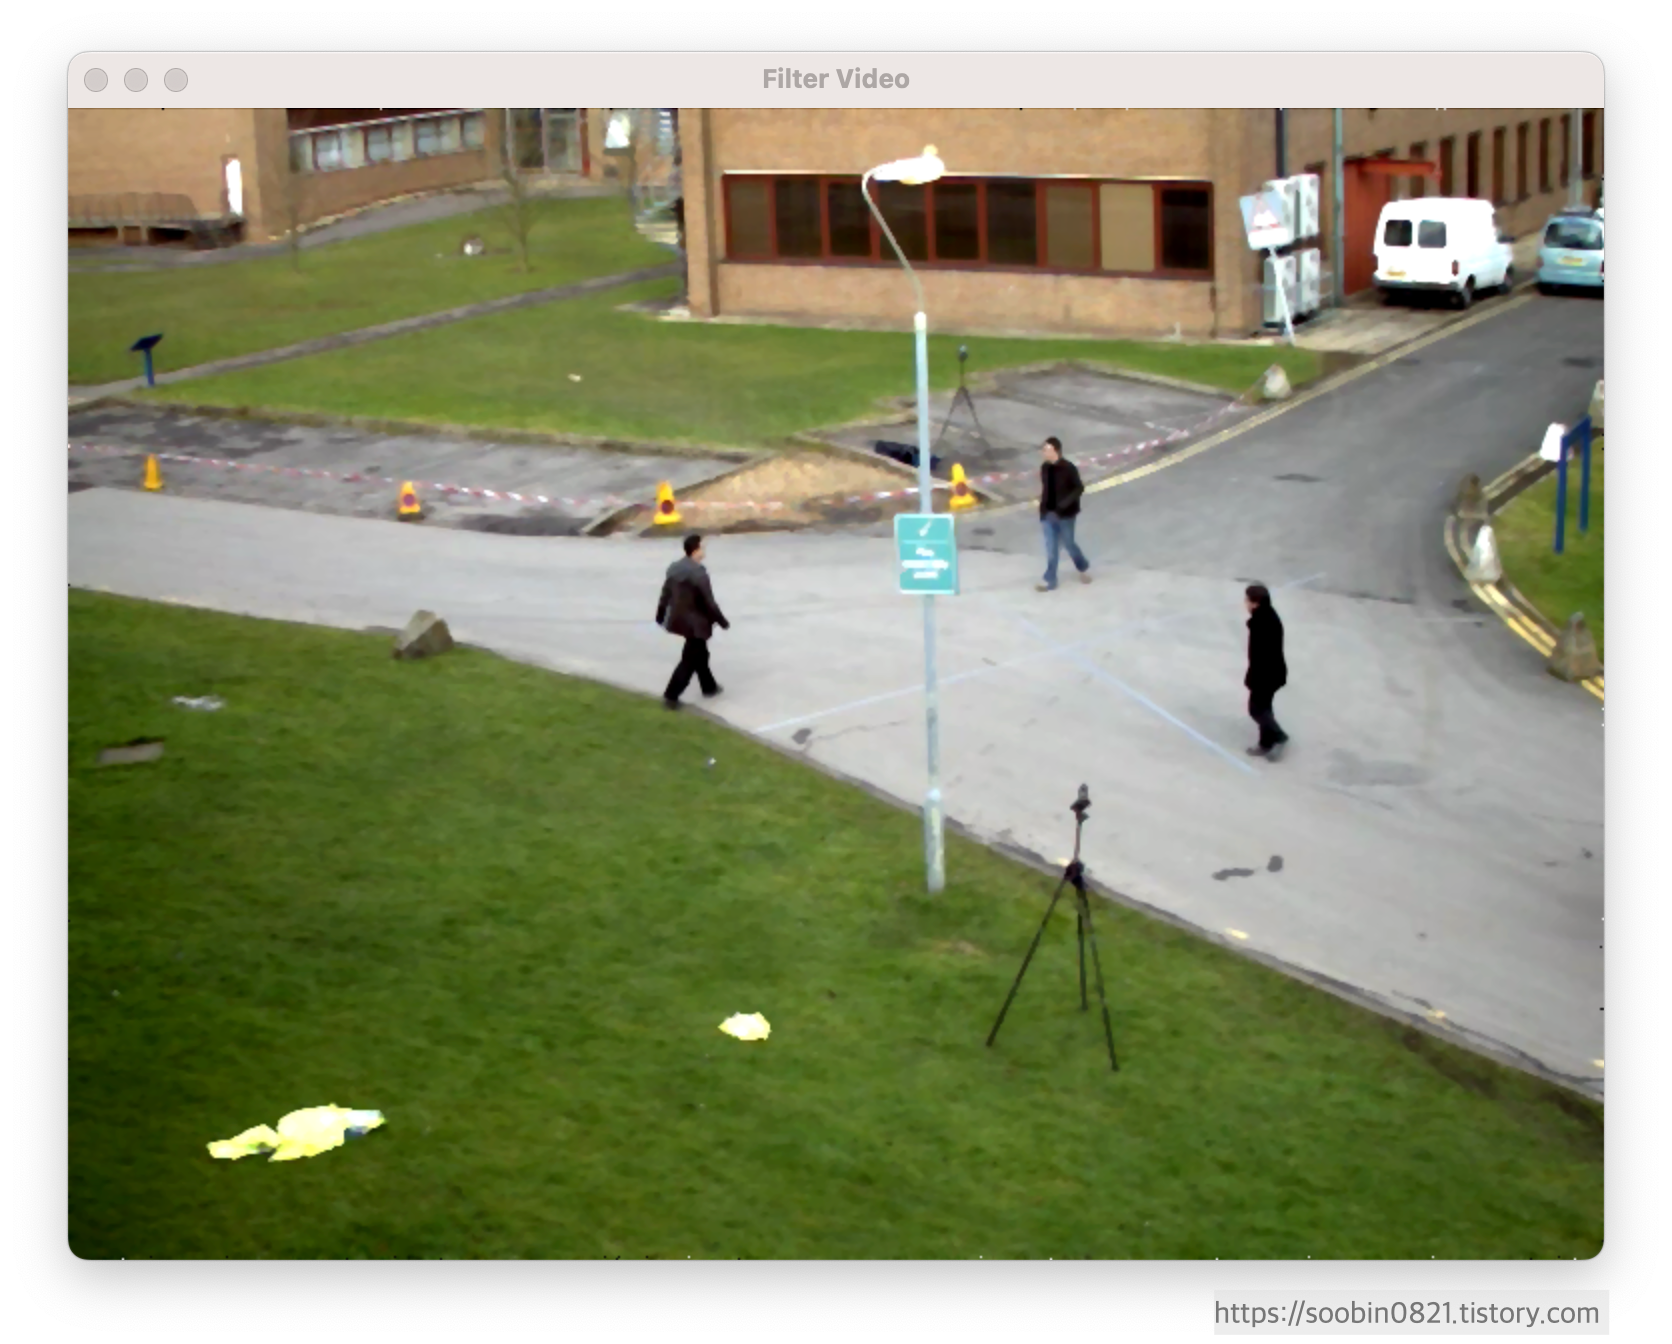
- 추가된 Salt and Pepper 노이즈는 대부분 제거되었다.
- 원본 영상에 비해 블러링(bluring)되었다.
GitHub
https://github.com/YunSoobin/ParallelProgramming
GitHub - YunSoobin/ParallelProgramming: 영상처리 알고리즘 병렬화
영상처리 알고리즘 병렬화. Contribute to YunSoobin/ParallelProgramming development by creating an account on GitHub.
github.com